
third time is the charm?

Continuing with the 2018 Chrysler Pacifica "minivamper" build, I'm now on my third iteration of the plan. The problem with Youtube is there is always another build, another idea to process, and that explains version 2, which just didn't do it for me. For comic relief, here is a picture of stillborn version 2. The frame just took took much of the height away needed for the kitchen pull out. 

Luckily, my 3am brain is alive and functional, so version 3 is explained a little bit below...

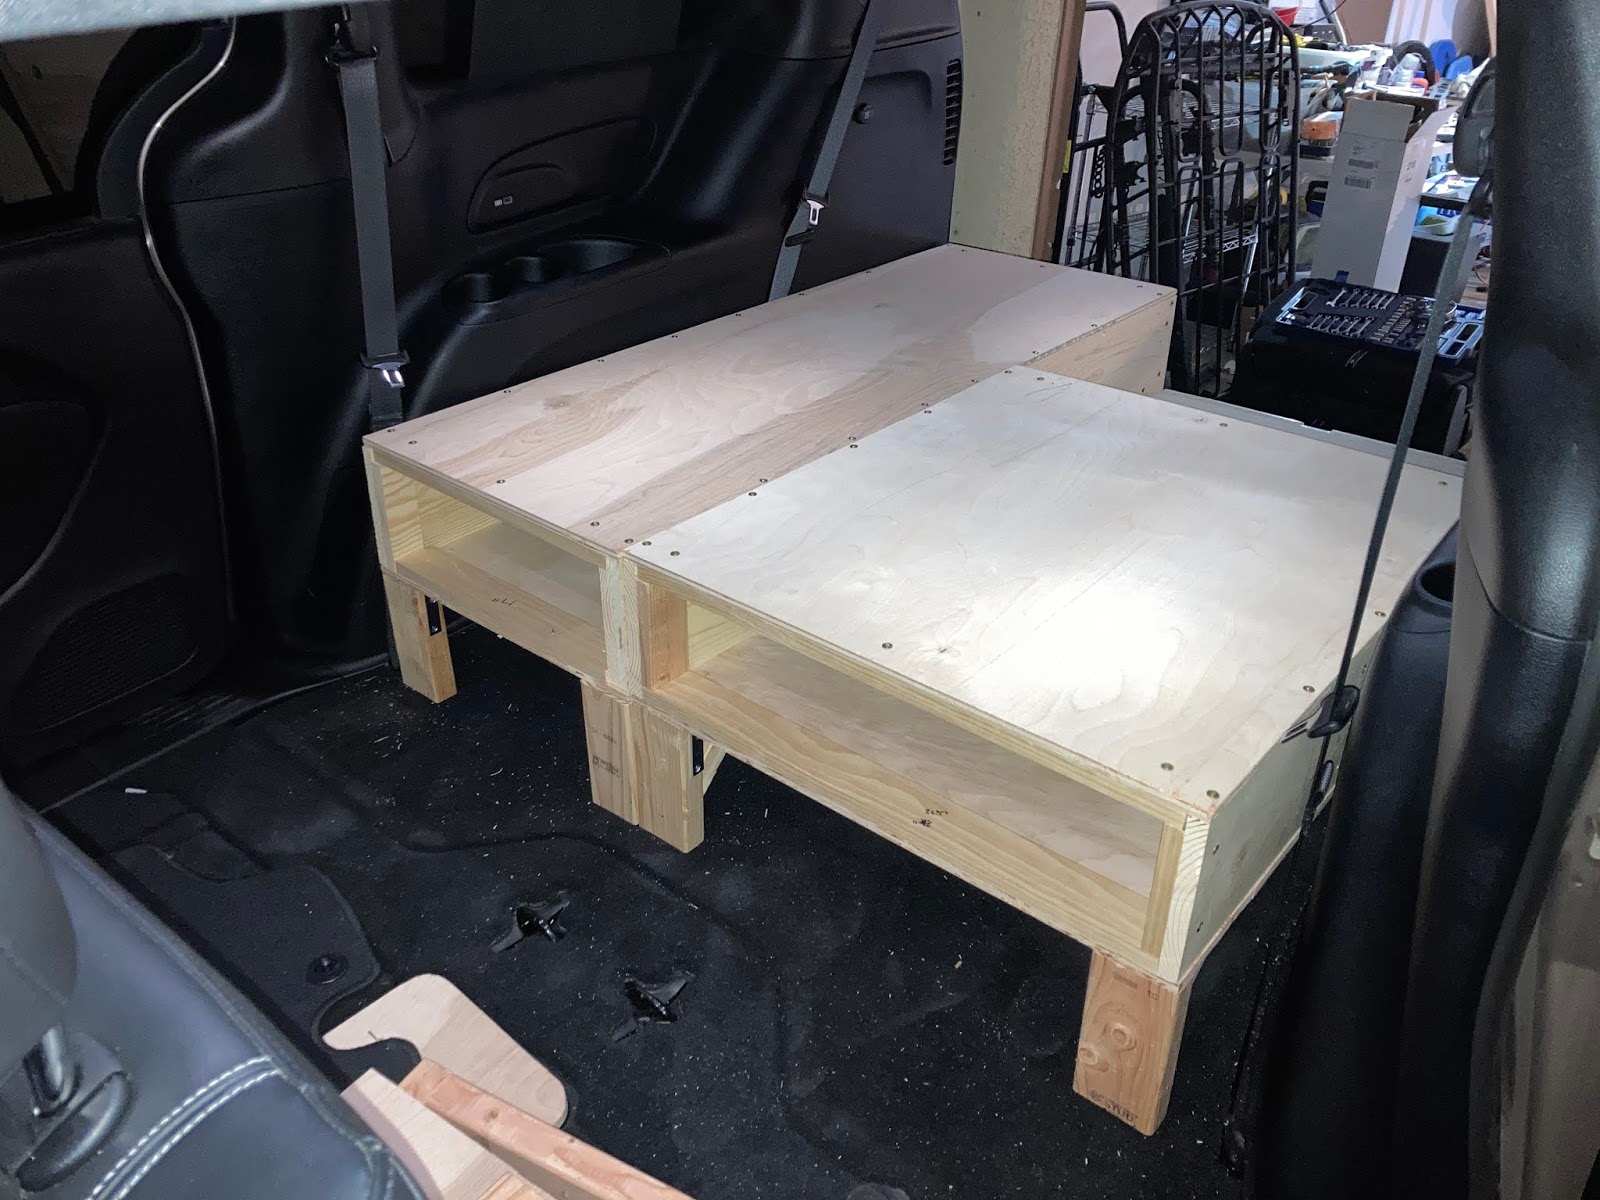
The main bedframe structure consists of two boxes, the passenger side is 20x55, and the driver side is 28x33. The driver side box is shorter front to back than the passenger side to allow clearance for the Yeti 45 that we will keep in the back. The height of the boxes is 8", which is to accommodate our Coleman Eventemp 3-burner camp stove. I didn't want to go any higher than 8", because, once leveled, the top of the boxes is roughly 16" high off the floor. The distance from the floor to the root inside is 46", which leaves 6" for the mattress and the rest to headroom. I've seen many designs that do not leave enough headroom, and it is like sleeping in a coffin. 

Here is a mockup of the 2 sections, and Mr. Yeti seems happy with all that room!


Here is a look at the passenger side box, I'm using 7 1/2" x 3/4" common lumber for the sides and bracing, with 1/2" birch plywood tops, bottom, and center support. I didn't really use any plans for the box construction, I just sorta winged it. 


Here is a good look at how the sides of the boxes are constructed. These are actually the sides for the driver side box. They have the vertical supports and slotted for the center vertical support.

And here is the construction of the driver side box.

Here is a picture of the center support, leveled, and ready to go. Also, a closeup of the M10 bolts.


With the front legs attached, Liz is checking out my workmanship and looking for defects (don't look too close!) That large hole 3/4 way to the back is the access to where the 2 sections will be bolted together. The 2 sections will be bolted together in the front too, but access is much easier.

Here are the 2 sections installed, they still need to be bolted together. We'll start looking for bins that will fit in from the front. Still, todo is the fabrication of the front sections that will extend from the boxes to the back of the front seats. The plan right now is to build 2 tables, one 30 x 20, and the other 30 x 28 that will serve as the front part of the platform but also be removed if additional table space is needed outside, I'm hoping for my 3am inspiration on this piece!

Here are a couple final shots of the rear, with test fitment of our Coleman Eventemp 3-burner camp stove

I tested it on the driver's side for grins, but the plan is to have it slide out of the passenger side box. Not installed yet, a hinged platform extending back from the driver side box another 12". The extension is needed to support the mattress and by having it hinged, you will still be able to open the Yeti completely if needed.


Supply List:

  1. (4) 7 1/2" x 3/4" common lumber, 8 ft. long
  2. (2) 1/2" birch plywood, full sheet
  3. 8 x 1-1/4" cabinet screws 
  4. 8 x 1-1/2" cabinet screws (top/bottoms screws into sides)
  5. (3) M10 1.5 x 75 bolts, washers, and nuts (These are for the center support that screws into the holes left by the rear stow-n-go seats.
  6. Wood glue

Tools Used

  1. Circular saw
  2. Jigsaw
  3. 1/4" driver/screwdriver
  4. Speed square
  5. Tape measure

Comments

Popular posts from this blog

a clean slate!

Maybe it's being cooped up because of COVID-19, or maybe it's a little bit of a mid-life crisis, but I miss road trips. Who knows when we will get back to normal, but in the meantime, I thought it would be a fun distraction to build a road-tripping vehicle, so we can travel and have a place to sleep along the way. The van life appeals to me, but panel type vans are generally big and bulky and not the best as daily drivers. So based on that, a minivan seems just the ticket! Introducing "Chrissy", our new to us 2018 Chrysler Pacific Touring L, S Edition. Never thought I'd be driving a "minivan" but the Pacifica just seemed to have a bit more style than all the others with its blacked-out trim and eighteen-inch black alloy wheels. About that clean slate... Like most of the other minivans on the market, the Pacifica can fit a full 4x8 sheet of plywood when all the "stow-n-go" (henceforth SnG seats) seats are folded down into the floor. As we won

how to draw an owl

  One common theme I've found in van building is Youtube videos showing the plans, the clean slate, the build, and the finished product. If you are new to van building as we are, it's a lot like those instructional videos on how to draw an owl, but they skip over the important stuff. If you bought a van like a Sprinter or Promaster, there are hundreds of plans to chose from. With the Chrysler Pacifica, not so much. We've entered into the envisioning phase of the build.  What do we need to carry? Where does it fit? How quickly can we access commonly accessed items? Where is the pantry? Where is the cooler? As you can see, there are a lot of "circles" for building this "owl!" The middle front-to-back 2x2 is the level bar. Our driveway is on a slope, so I premeasured the floor slope from front to back, and by having a leveling bar, I can quickly see clearances and what may or may not fit. The front starts out at 13", which is the height of the center c